Build An Ultra-Inexpensive, Energy-Efficient House
An Easier, More Durable Roof
I recommend a metal roof. It allows you to space your trusses 4' on center, instead of 2', and it's a lot easier to get the metal panels up in place than it is to drag sheets of plywood and bundles of shingles. I went with white enameled steel roofing that has a 20-year warranty on the paint. Properly installed, and with no leaves settling on it, this roof should last 50+ years, according to my carpenter friends. The white metal roof sheds snow in winter and reflects heat in summer far better than shingles. Overall, the cost is roughly the same.
Once the 4x6s are set, you'll start attaching the top plate. This is one of the tasks on which you'll be glad to have the mobile home in place. Instead of working on a ladder, you can do much of the work standing on the mobile home roof. (If you're not using a mobile home, you'll probably want to install the 2x10 bottom plate now to stabilize the posts. I did this later, in part because I was storing most of my lumber under the mobile home to keep it dry.)
Use 2x10s for the top plate, one on each side of the 4x6s. Use a mix of 10' and 20' 2x10s for posts spaced 10' o.c., so that you never have two intersections on the same 4x6. Wherever your 2x10s intersect on one side of a 4x6, have the other side be the middle of a 20' span. Use galvanized pole barn nails or bolts to attach the top plate to the posts. You won't have much room on the 4x6, so measure your 2x10s very carefully to make sure their ends always reach halfway onto the 4x6 where they'll be attached. Always pre-drill the nail holes at the ends of the 2x10s, or you'll split the wood. Nail a small piece of 2x4 flush underneath the intersection of the 2x10s to support the 2x10 ends while you secure them; leave it there to provide permanent, extra support.
Brace the top plates with 2x6s that form 45-degree angles up from the posts and extend up between the top plates. Cut the bottom end of each 2x6 at a 45-degree angle, pre-drill holes, and screw it into the post, then attach a short piece of 2x6 just below it to add further support.
 This photo shows the top plates attached to the 4x6s and braced by 2x6s.
Once your top plates are in place, you can start attaching the trusses. Note the hurricane clips in the above photo, used to help secure the trusses to the top plate. Getting the trusses up on the roof all by myself was a little tricky, but I found that I could slide each one up on the end of the mobile home until the majority of its weight was above the pivot point. Then it would gently tip up onto the mobile home roof. If you're doing this without a mobile home interior, you'll need at least one, probably two helpers. The end truss needs to be braced plumb, then each subsequent truss is secured to the other trusses by bracing, until the purlins take that job. Make sure to align the end trusses with the plane on which you will eventually install the end sheathing for the walls below.
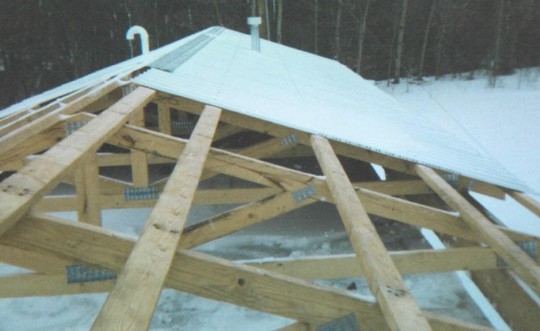
The 2x4 purlins go 2' on center. You'll note several useful details in this photo. Remember to stagger purlin intersections on each truss, so that below and above an intersection are spans of uninterrupted wood. (What look like intersections in the photo are sometimes pencil lines.) Having the mobile home roof to walk around on makes installing the purlins and roofing much easier and safer than working on a ladder or scaffold.
Once all the purlins are in place, you can start installing the roofing. I saved a ton of time by stacking my roofing sheets and pre-drilling the nail holes, which I drilled on the tops of the roofing's ridges. Since that time, the recommended best practices for metal roofing have changed; screws, often self-tapping, with neoprene washers have replaced nails, and they are placed in the flats, not the ridges. Your roofing will come with an installation guide.
Don't try to slide the sheets of roofing onto the mobile home roof from the ground as you did with the trusses. They're too short, and if a piece slips back down at you, it will come edge-first and could easily take a big slice out of you. You'll be able to carry them up a ladder, or better yet, have someone help you.
If for some reason you nail your roofing instead of using screws, your ears will be especially grateful for protection during this noisy process. Screw or nail so that each neoprene washer is snugly pressed, but not squished outward. The hardest part, and the most crucial, is making sure your roofing sheets stay plumb. A slight error at one end of the roof will be immense by the time you get to the other end. You can make tiny adjustments as you go, but a good start will make it all a lot easier.
You'll want ventilation for the space below your new roof. One simple screened vent at each end might do, but you can get much more ventilation through convection by installing vented soffits and a ridge vent. Installing a fascia board and soffits will keep birds and most insects from moving in, but squirrels and even raccoons can climb up your foundation posts and get between your mobile roof and your new roof if you don't block them. Inexpensive chicken wire will do as a barrier across the space next to your top plates.
Next: Insulation