Build An Ultra-Inexpensive, Energy-Efficient House
Sheathing, Siding, Windows, Doors, Girders, and Crawlspace
Use 2x6s to frame out around the windows and doors so that the outer edge of all of the framing lies within the same vertical plane. If you don't have a laser, use a good, straight 2x4 to check that all of the edges are "flat" with respect to one another. You might have to add some thick shims here and there and trim some 2x6s elsewhere. Trimming along the length of a board is difficult, and trying it with a circular saw is dangerous. The owner's manual for your circular saw should give you the following warning; take it seriously: Whatever you do, don't try to hold a 2x6 with one hand while you use a circular saw to trim with the other. If you must do any of this type of trimming with a circular saw, read the manual, use clamps to hold the board, and be extremely careful.
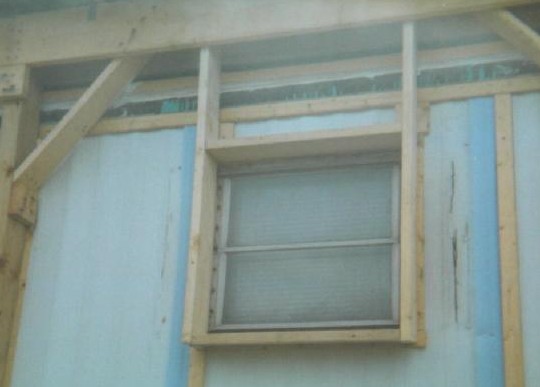
Around the windows, you'll basically be building rectangles made of 2x6s that extend up between the top plates and are also attached to furring strips that are attached to the framing of the mobile home. Make sure the 2x6s that form the bottoms of the window boxes slope away from the house so that precipitation will drain off. If the mobile home has crank-type windows, leave an inch more space around the sides of the windows than you see in this photo, because if you ever need to replace parts of the cranking system, it will be a lot easier with room to get tools onto the outside edges of the windows.
Nailing up the girders is the easiest part of the whole process. A close look at this photo will provide many useful tips. Note especially that a girder always runs across the bottom and top of a window. Uneven spacing of girders makes nailing the sheathing a little harder, but otherwise is fine as long as no significant spans are spaced more than 2' o.c. Note also that the middle of the bottom girder should form a horizontal line where the bottom of your wall sheathing and the top of your crawlspace sheathing will meet.

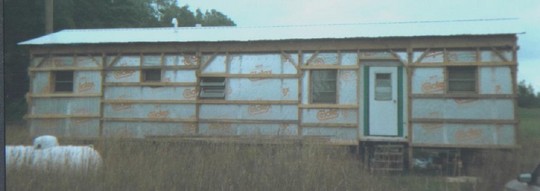
You can sheath with plywood or OSB if you plan to finish with vinyl siding. OSB is less expensive and fine as long as you cover it pretty quickly. The other alternative is to use a sheathing that also acts as siding, such as T1-11 or hardboard sheathing, which I used. These two choices will require some kind of weatherproof coating. Paint will work with either, and stain will work with T1-11. Use a paintable caulk to seal up all joints, including around windows and doors, before you paint. Exterior spackling paste (available at Sears) will help with bigger gaps.
If you paint, using top quality will save you time and, in the long run, money. Use a good primer, too, even for preprimed hardboard. Staining might look better on T1-11, but most stains require more frequent reapplication than a good paint. The old oil-based stains were quite toxic, and the current oil-based stains might still be, but the newer, water-based stains are much less so.
To begin sealing the crawlspace, attach pressure-treated 2x10 bottom plates to the outsides of your posts. If you're using a mobile home as an interior, you'll want the bottom plates flush with the ground. If you're building everything from scratch, you should have already attached the bottom plates, and because they'll have to support a floor, you'll need them doubled up and staggered like the top plates. Bottom plates that support a floor must also be high enough that you'll be able to crawl underneath, so you'll need a strip of pressure-treated boards on the outsides of your posts at ground level to support the bottoms of your crawlspace covering and insulation panels. 2x4s would do structurally, but to keep the bottom edge of your crawlspace covering well above the ground, you'll do much better with 2x8s.
The least expensive cover for the rest of the crawlspace opening is OSB, and some lumber retailers will cut it for you at no charge if you bring a pencil and mark the cut lines at the store. Plywood is more expensive than OSB, but more resistant to moisture. Either material should be primed and painted on both sides and all edges, because, in winter, the side facing the crawlspace will be colder than the air under the house and thus collect condensation. Waterproof products are also available that don't need to be coated, but they're more expensive.One disadvantage of a crawlspace is its attractiveness to creatures such as mice, and larger animals such as woodchucks and raccoons might also dig under if they get a chance. If you just want to stop animals from burrowing under right at your bottom plate, you can attach a 3' strip of galvanized chicken wire so that it starts on the outside of the bottom plate, goes a foot undergound, and then bends 90 degrees to extend outward. This fence will reliably stop the burrower, who won't think to start farther away. You can also keep creatures out pretty effectively by digging a 6" wide trench all around the perimeter of the house and filling it with concrete or burying a galvanized metal barrier. Woodchuck tunnels can be up to five feet deep, but they're usually three or four. A more expensive alternative is to pour a concrete slab as a crawlspace floor and barrier to underground entry. With either of the latter solutions, you'll want to make sure your bottom plate or board sits flush on top of your barrier.
After you seal the crawlspace, you should insulate it. Attach your leftover pieces of Celotex to the inside surfaces of your bottom plate or board and the lowest girder. This will keep your floor much warmer in winter and, unlike insulating the underfloor directly, it will help protect your pipes from freezing.
If you didn't pour a slab, cover the ground in your crawlspace with poly tarps. This, along with some ventilation, will help keep the crawlspace dry.
Next: Safety