Build An Ultra-Inexpensive, Energy-Efficient House
Effective Insulation
Resistance to heat transfer is measured as R value. The higher the R value, the less heat is lost per unit of time. For example, a wall with an R value of 20 will lose half as much heat per hour as a wall with an R value of 10.
In a house framed with 2x4s, the wall is 3.5" thick. If fiberglass insulation is installed without any gaps, completely free of moisture, and not sagged or compressed, the parts of the 3.5" wall between the studs will have a maximum R value of 13, assuming no air infiltration, and the studs themselves have an R value of only 1.25 per inch. In real applications, where gaps, moisture, sagging, compression, and air infiltration are all commonplace, the effective R value is often as low as 8 and, with below-average construction, sometimes much lower. For a wall framed with 2x6s, perfect conditions will yield a maximum R-19, but real applications average closer to R-12. Fiberglass is also a health concern.
For all of the above reasons, and because fiberglass is so unpleasant to handle, I decided to insulate with a foil-faced, semi-rigid, polyisocyanurate foam board. I bought the Celotex brand in the 2" thickness. It was fairly expensive, but its effective R value is 17.2, and unlike fiberglass, this R value does not degrade over time. The 2" foam itself has an R value of 14.4, and the foil facing adds another 2.8. Air infiltration through Celotex is impossible, it can't sag or compress, and it can't absorb moisture. By attaching the Celotex to my existing walls and roof, I added R 17.2 to my existing R values.
I debated several ways of attaching the 4'x8' Celotex sheets to my structure. While I was building the roof, I was glad to have the mobile home there to stand on, but when it came time to insulate, the job would have been far easier if I were just working on an empty shell. On an empty shell, I could have just attached the Celotex to the underside of the trusses and to a lightweight framework of girders attached to the inside of my 4x6 posts. With the mobile home in place, neither of these easy options made sense.
To insulate between the mobile home roof and the new roof, I ended up laying furring strips upon the mobile home roof, nailing 2" Celotex sheets to the furring strips, and sealing all of the joints with spray polyurethane foam. (Great Stuff and Reddy Foam are two common brands.) The spray foam is messy stuff, but neatness didn't matter. I ended up with a layer of Celotex suspended above my old roof and a tight enough seal on that layer to trap a dead air space in between, which adds significantly to the insulating effect.
Attaching the Celotex to the walls proved much more difficult. I ended up having to cut all kinds of odd shapes to fit around windows and, worst of all, the angle braces going from the 4x6 posts to the top plates. A different bracing system or a consistent 2"+ spacing between the mobile home and the new shell would have helped a lot. The Celotex cuts easily with a big bread knife, but the 2" thickness is reinforced with fiberglass fibers. I found this out the hard way and spent a couple of weeks trying to get the irritating fibers out of my fingers. If I had to do it over again, I would definitely find a foam board that does not contain fiberglass, even if it cost more or insulated somewhat less. Wear a respirator when you cut these boards.
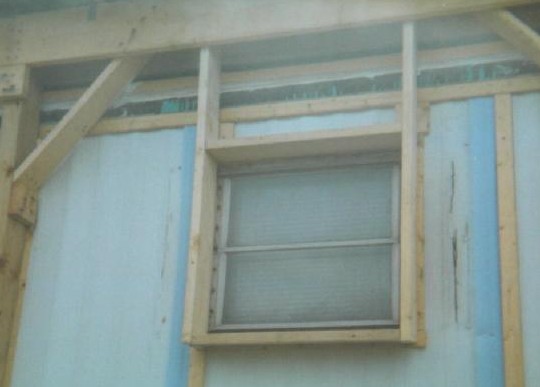
To create a dead air space between the walls and the Celotex, I nailed the perimeter of each piece of Celotex to furring strips. Finding wood in the mobile home walls into which I could nail the furring was difficult, and I had to make sure I was never nailing anywhere near any wiring. Glue might have been easier. The light blue foam you see here is sill seal, which I folded over the furring strips so that both sides of the furring strips would have compressed foam sealing a dead air space every four feet once I nailed down the Celotex.
The furring strips must be exactly 4' on center so that the edges of each 4'x8' sheet of Celotex will meet at the center of a furring strip. It's well worth the extra time it takes at the lumber yard to pick out nice straight furring strips. Seal all of the Celotex intersections with caulk and the top and bottom edges with spray foam to ensure that all-important dead air space.
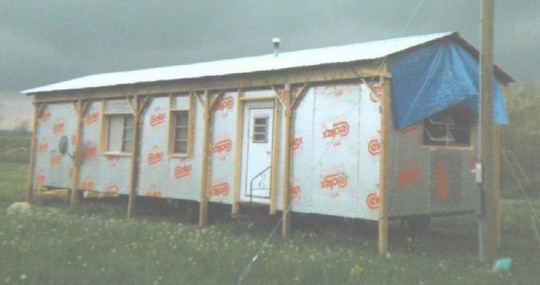
Here the house shows off its shiny new Celotex jacket.
Next: Sheathing